Crafting a Netherland Windmill 3D Shadow Box SVG
There is something undeniably magical about paper art that pops off the page. When light hits the layered edges of a cut design, it creates depth and shadow that flat images simply cannot achieve. This is the core appeal of the Netherland Windmill 3D Shadow Box SVG, a digital template designed to bring the iconic Dutch landscape into your home or studio. Whether you are a seasoned crafter with a workshop full of tools or a beginner looking for a relaxing weekend project, this layered square paper-cutting template offers a perfect blend of creativity and precision.
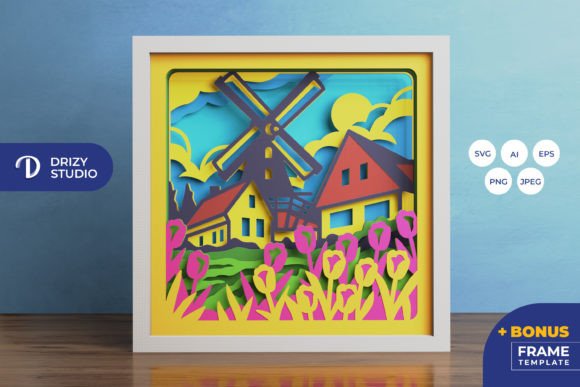
At its heart, this project is about transforming a digital file into a tangible piece of art. The design features a classic windmill set against a vibrant tulip garden, capturing the essence of the Netherlands in a compact, framed format. The template is engineered with nine distinct layers, each contributing to the overall three-dimensional effect. When assembled, these layers create a sense of distance and perspective, making the windmill appear to stand tall amidst the flowers. The result is a sophisticated piece of wall decor that looks far more complex than the process required to make it.
Why Choose a Layered Paper Template?
The primary value of using a pre-designed Netherland Windmill 3D Shadow Box lies in the time and effort it saves while ensuring professional results. Designing a multi-layered scene from scratch requires a deep understanding of spatial relationships, color theory, and structural integrity. You must calculate how much space to leave between layers to allow for shadows without the pieces collapsing. By starting with a high-quality SVG file, you bypass the trial-and-error phase of design and move straight to creation.
This specific template is optimized for versatility. It comes in a variety of formats including AI, EPS, PNG, and JPEG, but the SVG file is the star of the show for crafters. SVG stands for Scalable Vector Graphics, which means the lines are defined by math rather than pixels. This allows you to resize the design to fit different frame sizes without losing any sharpness or detail. Whether you want a small 8-inch accent piece or a larger statement wall art, the file adapts seamlessly, provided you maintain the aspect ratio to keep the proportions correct.
Tools and Materials for Success
One of the most inviting aspects of this project is its accessibility. You do not need expensive industrial equipment to bring this Tulip Shadow Box to life. If you own a electronic cutting machine like a Silhouette or Cricut, the process is incredibly streamlined. You simply upload the SVG file, select your material settings, and let the machine do the precise cutting work. These machines excel at handling the intricate details of the windmill blades and the delicate petals of the tulips.
However, lacking a cutting machine should not stop you. The design is also suitable for manual cutting using a sharp art knife and a self-healing mat. While this method requires more patience and a steady hand, it offers a meditative quality that many hobbyists enjoy. For those going the manual route, taking your time on the inner cuts of the windmill structure is key. Regardless of your cutting method, you will need basic assembly supplies: glue or double-sided tape is essential for stacking the nine layers. Foam adhesive strips are often recommended as they provide consistent spacing between layers, enhancing the 3D shadow effect.
Creative Applications and Display Ideas
The finished Netherland 3D Shadow Box is remarkably adaptable to different interior styles and purposes. Its square format, measuring approximately 20.32 cm by 20.32 cm in its standard size, fits perfectly into standard square frames found at most craft stores. This makes it an ideal candidate for creating a gallery wall where multiple shadow boxes can be arranged together. You might create a series featuring different landscapes or seasonal variations, using the same layering technique.
For those who want to elevate the visual impact, turning this project into a lightbox is a fantastic option. By inserting thin LED strip lights between the layers during assembly, the paper becomes translucent, glowing softly from within. This is particularly effective for the tulip garden scene, where the light can mimic sunlight filtering through the flowers and illuminating the windmill. This variation transforms the piece from a daytime decoration into a captivating nightlight or ambient mood setter for a living room or bedroom.
Beyond personal home decor, this template holds significant potential for small business owners and entrepreneurs. Handmade, personalized gifts are always in demand. A custom-colored version of this shadow box, perhaps using a recipient's favorite color palette for the sky or flowers, makes a thoughtful present for friends, family, or colleagues. Educators can also utilize this project in art classes to teach students about layering, perspective, and the mechanics of light and shadow in a hands-on environment.
Important Considerations Before You Start
While the process is straightforward, there are a few practical details to keep in mind to ensure the best outcome. First, consider your choice of paper. Cardstock is generally the best material for shadow boxes because it is sturdy enough to hold its shape but thin enough to be cut cleanly. Heavier paper may be difficult to cut manually or might jam smaller cutting machines, while paper that is too thin may warp when glued. Experimenting with different weights and textures can yield unique results; textured paper can add an organic feel to the tulip fields, while smooth cardstock offers a clean, modern look.
Color selection is another critical element. The preview images provided with the template are for illustrative purposes only. The final appearance of your Netherland Windmill 3D Shadow Box SVG project will depend entirely on the paper colors you choose. Keep in mind that lighting sources in your room will affect how the colors appear once framed. Darker papers will absorb more light and create deeper shadows, while lighter papers will reflect light and create a softer, airier feel. It is often helpful to lay out your colored sheets in the order of the layers before cutting to visualize the gradient and depth.
Finally, remember that patience is your best tool during assembly. Aligning nine layers perfectly requires care. It is advisable to dry-fit the layers before applying any adhesive to ensure everything sits flush within the frame. If you plan to add LEDs, test the lighting setup before sealing the back of the frame. Taking these small precautions ensures that your final product is not just a craft project, but a polished piece of art ready for display.
Embracing the world of papercraft opens up endless possibilities for expression. With a detailed template like this, you have the foundation to create something truly special. Whether displayed on a mantle, hung in a hallway, or gifted to a loved one, this windmill and tulip scene brings a touch of European charm and dimensional beauty to any space. Get started with your Netherland 3D Shadow Box today and experience the satisfaction of building depth, one layer at a time.